
How To Fix Disconnected Air Ducts?
If you’ve got a broken air duct, your first step is identifying the problem. It is possible to do this by examining your air ducts to find apparent defects or gaps. After you’ve identified the region responsible for the issue, you’ll be required to separate your duct and the air handling unit or the plenum to which it is attached. It is possible to use a duct’s metal tape or sealant to reconnect the disengaged duct. Be sure to wash areas of the duct and the plenum before applying the sealant or tape for a safe and secure connection. After reattaching the duct start your HVAC system and look for any air leaks or unusual sounds. If you still have issues, you should speak with an expert HVAC technician to identify and address the issue. Be aware that regular maintenance and frequent inspections of the air pipes will aid in preventing future problems It’s a good idea to incorporate it as part of your home maintenance routine.

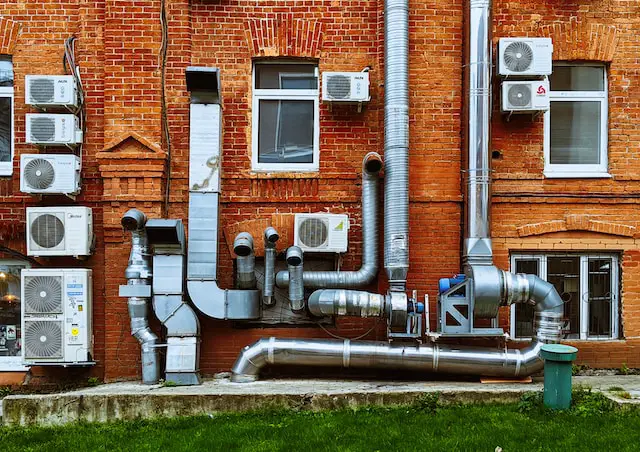
How Do You Reattach An Air Duct?
As a homeowner, the most frequent issues you’ll confront in HVAC equipment is a broken air duct. This can result in decreased efficiency, increased bills for energy, and inconsistent temperatures in your home. But, with the right tools and information, you can quickly connect an air duct to restore proper airflow to your home. This post will discuss reconnecting an air duct and some helpful tips to avoid future problems.
Step 1: Identify The Problem Area
The first step to reconnecting the air conduit is pinpointing the problem. This is done by checking your air ducts for any apparent holes or damage. You may also switch on your HVAC and look for places with little or no air flowing out of the vents. After you’ve identified the region that is the source of the problem, you can mark it using the help of a pencil or tape to refer to it easily.
Step 2: Disconnect The Duct
In the next step, remove it from the air handler or plenum. This is usually done by removing the screws or clamps that secure the duct into the position when the duct is unplugged and inspected for any damages or debris that could be causing the issue.
Step 3: Clean The Surfaces
When reattaching the duct, it is necessary to clean the surfaces of the pipe and the plenum to the plenum to which it will be attached. This will ensure a secure connection as well as stop air leaks. You can apply an irrigating cloth or brush to clean any debris or dirt and then allow the surfaces to dry completely.
Step 4: Apply Duct Tape Or Sealant
When the surfaces are clean and dry, attaching the duct again using metallic tape or a duct sealant is possible. Duct tape is an extremely popular option because it’s easy to apply and easily available. When using duct tape, wrap it around the joint Be sure to fill in any holes or gaps. For larger gaps, you might need to apply multiple layers of tape.
Duct sealant is a different option that provides a secure connection. It’s a sticky liquid sprayed onto the connection point and left to dry. It forms a solid connection immune to air leaks and can endure extreme temperatures. When using duct sealant, you must apply a substantial amount to the connection point and then apply a putty knife to distribute the mixture uniformly.
Step 5: Test The Connection
After you have reattached the duct switch on your HVAC unit and looked for strange noises or air leaks, if you still have issues, it is recommended to seek an experienced HVAC technician to determine and correct the issue. If the connection is solid and there aren’t any air leaks, you can rest sure your HVAC is operating correctly.
Preventing Future Issues
To avoid future problems in your air ducts, it is essential to conduct regular inspections and maintenance. This includes cleaning your air ducts, replacing air filters, and checking for signs of wear or damage. Having your HVAC system maintained by a certified technician annually is also possible.
How Do You Secure Air Ducts?
Securing your air ducts properly ensures that your HVAC system operates efficiently. Air leaks and disconnected ducts could result in reduced airflow, higher bills for energy, and health issues because of low-quality indoor air. In this post, we’ll discuss some ways to aid you in the security of your air ducts and increase the efficiency of your HVAC system.
Step 1: Identify Problem Areas
The first step to secure the air conduits is to find any problematic areas. This is done by checking the air ducts for obvious defects or gaps. It is also possible to start your HVAC and look for any places with air flowing from the vents. Once you’ve found the areas responsible for the problem, mark them with a pencil or tape to make it easy to refer to them later.
Step 2: Clean The Surfaces
Before you secure the air ducts, it’s crucial to clean the air duct surfaces and the plenum to which it is connected. This will guarantee a secure connection and ensure air leaks are not leaking. Next, apply a damp cloth or brush to clean any dirt or other debris and allow the surfaces to dry completely.
Step 3: Use Metal Tape Or Duct Sealant
Metal or duct sealant sealing tape is the most popular method to seal air ducts. It is a well-known choice due to its simplicity to apply and easily accessible. To use it, simply wrap it around the point of connection. Be sure to fill in any holes or gaps. If you have gaps larger than the ones you see, it is possible to wrap more than one layer of tape.
Duct sealant is a different option that can provide a safer connection. It’s a sticky material sprayed onto the connection point and let dry. This forms a strong bond impervious to air leaks and can endure extreme temperatures. For duct sealant to be used, apply a large amount to the connection area, apply a putty knife, and apply the mixture equally.
Step 4: Use Mastic Or Fiberglass Tape
In some instances, using fiberglass tape or Mastic could be the better choice to secure air conduits. Mastic is a sealant that is flexible and is applied using a spatula or brush. It seals seams, joints, and connections within air ducts to patch tiny cracks or holes. The mesh-like tape is sprayed on the seam or joint and then covered with Mastic. It provides an additional layer of strength and also aids in preventing air leaks.
Step 5: Use Clamps Or Screws
For larger air ducts or ones subject to heavy pressure, clamps or screws might be needed to properly secure the ducts. Clamps are employed to connect the pipes to the plenum or other connections. Likewise, screws are used to secure the ducts onto joists or studs of the ceiling or walls. If you are using screws or clamps, following the manufacturer’s directions and choosing the correct dimension and type of equipment to complete the task is essential.
Step 6: Insulate The Ducts
Ultimately, it is essential to cover your air ducts with insulation to stop the loss of heat or gain and reduce the chance of condensation developing around the pipework. The insulation can be applied on the exterior of the ducts or within the interior of the plenum according to the type of HVAC unit you are using. This can increase the HVAunit’s performance andas lower your energy costs.
Duct Repair Kit?
Suppose you’ve discovered leaks in your air ducts or damages within your home. In that case, it’s essential to repair them as quickly as possible to prevent further harm to your heating system and avoid rising energy costs. Although it is advised to speak with an expert HVAC technician to make major repairs, small damage, and leaks can usually be addressed with the help of the air duct repair kit. In this article, we’ll examine the advantages of using a duct repair tool and the steps you can take to repair damage and leaks to the air duct.
What Is A Duct Repair Kit?
A repair kit for ducts is a cost-effective and simple solution to fix small air duct leaks or damage. It usually includes aluminum foil tape, a duct sealant tube, and occasionally fiberglass mesh tape for additional reinforcement. Repair kits for ducts are located in a wide variety of hardware stores. They’re made simple to use, even for people lacking any expertise in HVAC repair.
Benefits Of Using A Duct Repair Kit
The use of a duct repair kit can provide numerous advantages, among them:
- Cost-effective: A duct repair kit is more affordable than hiring an expert HVAC technician for minor repairs.
- Time-saving: A duct repair kit can be used quickly and quickly, saving you time and effort.
- Energy-saving: Repairing leaks in air ducts and damages can stop chilled or heated air from getting out through the duct, which results in an HVAC system that is more efficient and has lower energy costs.
- Better quality of indoor air: Air leaks and damages to ducts can let allergens and pollutants get into your home; however, remediating them using the help of a repair kit for ducts can enhance indoor air quality.
How To Repair Air Duct Leaks, Damage And Duct Leaks Using An Air Duct Repair Kit
Step 1: Identify The Problem Areas
The first step to repairing air duct leaks or damage is pinpointing the problematic areas. It is as easy as switching your HVAC and spotting areas without air flowing out of the vents. You should also check the air ducts for any obvious defects or gaps. Once you’ve found the regions responsible for the problem, you can mark them using an eraser or piece of tape for quick reference.
Step 2: Clean The Surfaces
Before applying the repair kit for ducts, it is essential to wash the surfaces of the pipe and the plenum to which it will be attached. This will guarantee a secure connection as well as stop air leaks. Next, apply an aqueous cloth or brush to clean any debris or dirt and then allow the surfaces to dry completely.
Step 3: Apply The Aluminum Foil Tape
It is then time to tape the aluminum foil onto the air duct that’s damaged or leaking. For the tape to be used wrap it tight around the point of connection Be sure to fill in any holes or gaps. For larger gaps, it is possible to apply multiple layers of tape.
Step 4: Apply The Duct Sealant
After applying an aluminum foil strip, you can apply the duct sealant to give you additional reinforcement. A sticky liquid is sprayed onto the connection point and left to dry. It forms a solid bond immune to air leaks and can stand up to extreme temperatures. For duct sealants, you need to apply a substantial amount to the area of the connection and then apply a putty knife to distribute the mixture uniformly.
Step 5: Use Fiberglass Mesh Tape (Optional)
For additional reinforcement For additional strength, you can apply the fiberglass mesh to protect your aluminum foil as well as duct sealant. This will add extra toughness and durability to the area that is repaired.
Step 6: Let It Dry
After applying the repair kit, allow it to dry completely before switching on your heating system. This will ensure that your repairs are secured and the ducts function properly.
Air Duct Repair Cost?
Air ducts are a crucial component of every HVAC system. They’re responsible for delivering cool or heated air to your home. But, with years, the air ducts may be damaged, leading to leaks and decreased effectiveness. If you’ve observed any problems regarding your air ducts, you may be wondering about how you will spend to fix them. In the following article, we’ll look at the various factors that impact air duct repair and estimate what you will be charged.
Factors Affecting Air Duct Repair Cost
Many factors influence the price of fixing air ducts. These include:
- The site of the issue: The place of the damaged ducts could affect the repair cost. If the area that is damaged is located in an area that is difficult to access, for example, the attic or in a crawl space or attic, the repair cost could be more expensive.
- The extent of the damage: The extent of damage can also impact the repair price. Damage and minor leaks could be repaired with the help of a repair kit for ducts, which is relatively affordable. If the damage is significant, the need to repair the whole air-duct which is more expensive.
- The type of HVAC unit: The kind you are using will also impact the repair cost. Certain systems are more complicated than others and require higher-end tools and knowledge to fix.
- Costs for labor: The cost of labor can be different to the location and experience of the HVAC technician.
Estimating Air Duct Repair Cost
Repairing air ducts isn’t always the same depending on the elements mentioned earlier. However, on average, expect to spend anywhere between $100-$1,000 for the repair of air ducts, with an average of around $500.
Minor repairs, like fixing a minor air duct leak, or replacing damaged ductwork parts, can cost just $100-$200. But if the issue is severe and requires a full repair to the air duct, expect to spend up to $1000 or more.
Remember that these estimates are only estimates, and the repair cost may differ according to the factors listed in the previous paragraphs. Therefore, obtaining an estimate from a qualified HVAC technician before beginning any work to repair air ducts is highly recommended.
How To Reduce Air Duct Repair Cost
Although the cost of air duct repair can be a bit different, There are a few ways you can cut down on the total price of the repair:
- Maintaining your HVAC system regularly: Regular maintenance can protect your air ducts from damage and prolong your heating and cooling system’s life. Make sure you change your filters regularly and plan annual HVAC servicing with a qualified technician.
- DIY repairs: Air duct repairs that aren’t too extensive, like fixing tiny gaps or leaks, could typically be completed using the help of a repair kit for ducts. This is an affordable option that will reduce the cost of labor.
- Comparison shopping: It’s always an excellent idea to request quotes from various HVAC technicians to ensure you pay a fair amount for repairs to your air ducts.
- Upgrades that are energy efficient: Switching to a more energy-efficient HVAC system could cut down on the requirement for air duct repair in the long term. This will result in lower costs for energy and fewer repairs in the future.
FAQ’s
What causes the air ducts to break off?
There are a number of reasons why air ducts can break off. They might have been inappropriately introduced, or they might have come free after some time because of vibration or development in the house. The ductwork may also be damaged by animals or pests.
How can I determine whether my air ducts have been disconnected?
Your air ducts may be disconnected in a number of ways. You might hear air hissing or whistling through the vents or notice that some rooms in your house are always warmer or colder than others. You might see an increase in your energy costs in some cases.
What are the ways of fixing disengaged air channels?
Calling a professional HVAC technician is the most effective method for repairing disconnected air ducts. They will be able to locate and properly reattach the disconnected ducts. The technician may have to replace the damaged ductwork in some instances.
Can I fix air ducts that aren’t working on my own?
It’s not a good idea to try to fix disconnected air ducts yourself because it can be hard and dangerous. Working with ductwork necessitates the use of specialized equipment and knowledge, and faulty maintenance can lead to hazardous fires or poor air quality.
Can disconnected air ducts have an impact on my home’s air quality?
Yes, your home’s air quality can be affected by disconnected air ducts. Mold and other harmful pollutants can grow in the attic, crawlspace, or walls if ducts are disconnected, allowing air to escape. It can also result in uneven heating or cooling as well as poor air circulation.
How can I avoid having air ducts break down in the future?
Ensure that an experienced HVAC technician installs the air ducts in order to avoid future disconnections. You can also schedule regular inspections of your ductwork to catch problems early. Finally, to keep air from escaping, make sure that any cracks or gaps around ducts are sealed.


