
How To Fix Runny Whipped Cream In A can?
If you’ve got thick, whipped Cream that is runny in a jar, The first step is to shake it vigorously for 30 seconds to 1 minute. This will help to aerate the Cream and help it become thicker. If shaking isn’t working, The issue could arise because the Cream has become warm. To remedy this, put the container in the refrigerator for a minimum of 30 minutes before you use it.

Another reason for the running whipped Cream that is not smooth is because the container is empty. If there’s not enough Cream inside the can and the propellant escapes, it will flow out more easily, which results in the texture becoming runnier. To prevent this from happening, make sure you use a complete can of whipped Cream.
If none are effective, there could be issues with the product itself. In this instance, you should consult with the manufacturer to resolve the issue or solicit a replacement.
It’s important to know that whipped Cream made from cans may not be as solid as homemade whipped Cream, which is made of heavy-weight Cream as well as sugar that’s been mixed. So if you have problems with whipped Cream runny from cans, you might think about making your own whipped Cream.
How Do I Fix The Runny Frosting Made From Whipped Cream?
The frosting of whipped Cream is a tasty and light alternative for frosting cupcakes, cakes, and other desserts. Sometimes, however, it may become too runny and ruin the appearance and flavor of the dessert. If you’re caught in this scenario, do not fret! There are many solutions to fix the runny cream frosting and ensure it is perfect for your dessert.
Before we get into the solution, we need to be aware of why whip cream frosting becomes runny in the first instance. Whip cream is made using heavy Cream whipped until stiffer peaks form and is typically sweetened with sugar and then flavored with vanilla. The whipped frosting is more fragile than regular whipping cream since it typically contains other ingredients such as cream cheese, gelatin, or pudding. These ingredients can alter the structure of the whipped cream and cause it to break down, resulting in a runny frosting.
Let’s Look At Some Options To Repair The Runny Frosting Made From Whipped Cream.
The Frosting Should Be Chilled:
The first step in fixing the runny frosting is chilling it. Put your frosting into the freezer for 30 minutes to one hour to set. The cooling temperature can help the whipped frosting retain its structure and keep it from further breaking down. Once chilled, you can whip the frosting once more to create a fluffier.
You Can Also Add More Whipped:
When chilling frosting isn’t enough to resolve the issue, it may be necessary to add some more whipped cream. Make an additional batch of thick Cream, then incorporate it into the smooth frosting. This will give additional structure to your frosting and increase its stability, making it denser and more creamy.
Add Stabilizing Agents:
Another method to improve the running whipped cream frosting is to include stabilizing agents such as gelatin, cream cheese, and powdered sugar. These ingredients will help to make the Cream more firm and keep its breakdown. Mix the ingredients with water for gelatin, then let stand for a couple of minutes before heating it and mixing it into the Cream. To make cream cheese, include it in the Cream, then beat until it is smooth. Sugar powder is added gradually to the Cream until it reaches your desired level of consistency.
Make Use Of Cornstarch:
Cornstarch is a fantastic thickening agent which is used in the process of repairing runny frosting. Mix cornstarch with water until they create a slurry, then heat it until it thickens. Allow it to cool before folding it into the frosting made of whipped Cream. This will give the frosting an extra layer of structure and thickness, making it more solid.
Make Use Of Instant Pudding Mixes:
Instant pudding mixes are a different ingredient which is a great way to repair an overly whipped cream frosting that’s runny. Mix instant pudding with cold milk as per the instructions on the package and then fold it into the frosting whipped Cream. The pudding mix will provide strength and structure for the frosting, which makes it more robust and smoother.
How Do You Whip Cream Out Of A Jar Without Stress?
Cream whipped with whipping Cream is an excellent and flexible garnish for all desserts ranging from cakes to hot chocolate to pies. Many people use whipped Cream in a can to make it easy and convenient. But if you cannot access a container of whipped Cream, or the pressure inside the can is gone, Don’t fret! There are still various methods of getting whipped Cream out of a container without pressure.
Before we get into the solution, let’s know how the whipped Cream in the can functions. The whipped cream inside a can is made of sugar, heavy Cream, and other ingredients blended and then pressurized with carbon dioxide or nitrous oxide. The pressure pushes the Cream to escape from the nozzle, creating the fluffy, light texture we love.
Let’s look at ways to get the whipped Cream from a can without putting pressure on it.
The Can Should Be Shaken Vigorously:
The best solution is to shake it vigorously. Even if the pressure is gone out, some whipped cream might still be in the container. You should give the container a shake for 30 to 60 seconds. This will help to re-aerate the Cream, making it more fluffy and easier to remove from the container.
Slice The Can Open:
If shaking isn’t working, The next option is to break into the lid. Then, utilizing a sharp knife, carefully cut from the outside of the container. Be sure to cut only enough to reveal the Cream whipped, however, not to the extent that the nozzle is damaged. Then, you can scoop the whipped Cream using the help of a spoon or spatula.
Make Use Of A Piping Bag:
Another method to extract the whipped Cream from the can without pressure is piping bags. As mentioned above, remove the lid, and then scoop the Cream into a bag with an angled tip. The bag should be squeezed to pipe the Cream on the dessert. This will give you greater control over the whipping cream’s quantity and placement.
Whip Up Your Cream:
If that doesn’t work, you can create your whipping cream by hand. First, make heavy Cream using an electric mixer or a whisk until it produces a stiff peak. Next, add vanilla extThen, add sugar to flavor and sweeten the Cream to suit your taste. This technique takes more effort than an ice cream can; however, it allows you to alter the taste and texture of the whipping Cream.
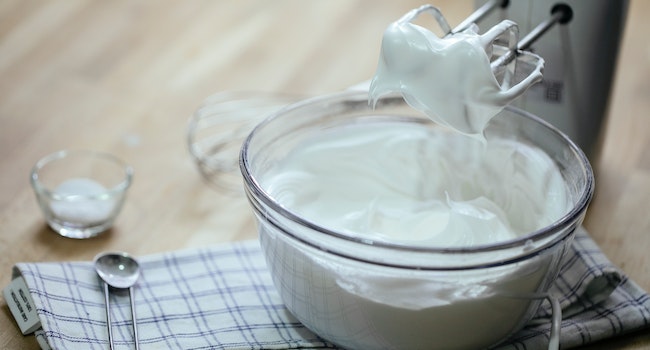
How Can I Thicken The Whipped Cream Without Gelatin?
Whip cream is a flexible topping suitable for cakes, hot chocolate, pies, and many more. But, at times, the whipped Cream may become too liquid and may not keep its shape. Adding gelatin is one method to thicken whipped Cream, but if you do not have gelatin or prefer not to use it, don’t fret! There are various other ways to thicken Cream that don’t require gelatin.
Make Sure To Chill Your Cream And Your Equipment:
One of the easiest ways to thicken the whipped Cream with no gelatin involves chilling your equipment and Cream before whipping. For example, set your mixing bowl and the beaters in the fridge for at least 15 minutes before you begin. This will assist the Cream in keeping its shape more tightly when whipped. In the same way, ensure the Cream is cool before whipping.
Sprinkle Powdered Sugar:
Powdered sugar can be added to thicken the whipped Cream without gelatin. The cornstarch in powdered sugar makes it a component it acts as a stabilizer that assists in keeping the Cream in its shape. Begin by whipping the Cream until it reaches soft peaks. Then, gradually add powdered sugar as you whip until you achieve the ideal consistency.
Use Cream Cheese:
Cream cheese is an excellent alternative to gelatin to thicken the whipped Cream. It provides stability and richness to the Cream. Cream cheese is a great ingredient to use. Begin beating until the mixture is smooth and soft. After that, gradually add the Cream and continue to beat until the mixture gets thicker and creates stiff high-pitched peaks.
Include Cornstarch:
Cornstarch can serve as a thickener for whipping Cream. Mix a tiny amount of cornstarch and water to make a slurry. Then, heat the mixture in a pot until it becomes thicker. Let the mixture cool to room temperature before folding it into the Cream. This will help to stabilize the whipped Cream and help it more stable.
Use Mascarpone Cheese:
Mascarpone cheese can be described as smooth Italian cheese that thickens whipped Cream. Begin by beating the Mascarpone cheese until it’s fluffy and light. Then, add the Cream gradually and continue to beat until the mixture becomes thicker and develops stiff white peaks. This will result in an intense and delicious whipping cream that retains shape.
Mix Instant Pudding:
Instant pudding mix is a great way to add thickness to the whipped Cream and give it an extra taste. Mix this instant in warm milk to ensure it becomes thicker, then fold it into the whipping cream. This will make an extremely stable and delicious cream that is whipped.
How Can You Stop Whip Cream That You Can Freeze From Melting?
Canned whipped Cream is an ideal and tasty topping for hot drinks, desserts, and much more. However, it can also be frustrating when the Cream begins to melt and lose its form before you finish your meal. There are many ways to stop whip cream that you can freeze from scalding and to ensure it remains soft and firm.
Cool Your Whipped Chocolate:
Before you use canned whip cream, it’s crucial to keep it chilled. Keep it in the fridge until it’s time to use it. Make certain to keep it cool during the time you use it. The colder the Cream, the less likely it will maintain its form and not melt.
Make Sure To Use It Sparingly:
Using too much-whipped Cream that is canned could make it melt more quickly. Instead, use it sparingly, and try not to pile it on your dessert. This will ensure it stays solid and stop it from melting too fast.
Add Stabilizers:
Adding stabilizers to your whipped Cream may help keep its shape and stop melting. A good stabilizer is a cornstarch. To use it, mix a small amount of cornstarch in water to form a slurry. Then, fold it into the whipping cream. This helps to thicken the Cream and help it stay sturdy.
Use A Cream Stabilizer:
Cream stabilizers are specifically designed to assist whipped Cream in keeping its shape and stopping melts from occurring. They’re available in the form of powders and are available at the majority of grocery stores. Follow the directions on the packaging for adding the stabilizers to your Cream, and you’ll end up with longer-lasting and stable whipping cream.
Keep Your Desserts Cool:
The whipped Cream is much more susceptible to melting when your food is hot. Ensure your desserts are cool by keeping them in the fridge until you’re ready to serve them. If you’re serving a warm dessert, wait until it’s cool before adding whip cream.
Serve Promptly:
The longer the whipped Cream in the can remains on your dessert greater the chance it will be to melt. Therefore, serve your desserts as soon as you finish adding the whipped Cream to stop the Cream from melting. This ensures that the Cream is kept smooth and soft.
Make Use Of Alternatives To Whipped Cream:
If you’re struggling to keep whip cream that you can freeze from melting, think about using alternatives to whipped Cream. Creamy whipped Cream made with sugar, and heavy Cream is a fantastic alternative that’s simple to prepare and is stabilized by adding powdered sugar or cream cheese.
FAQ’s
What makes whipped cream become runny in a can?
A number of factors, including improper storage, overbeating the cream, and using low-fat cream, can cause whipped cream in a can to become runny.
Can I use a can to fix runny whipped cream?
To fix runny whipped cream in a can, first thoroughly shake the can to combine the cream and any liquid that may have separated. After that, to let the cream chill and thicken, place the can in the refrigerator for at least 30 minutes. If the cream is still runny after being chilled, try whipping it by hand or with an electric mixer until it reaches the desired consistency.
Is it possible to prevent the can of whipped cream from becoming runny in the first place?
Yes, there are several steps you can take to prevent runny canned whipped cream. These include keeping the can in the refrigerator, using cream with at least 35% more fat, and not beating the cream too much.
How should whipped cream be stored in a can the most effectively?
Keep the can upright and place it in the refrigerator to store whipped cream. The cream may separate and become runny if the can is stored in a warm or humid environment.
How long can whipped cream be kept in the refrigerator in a can?
As long as the can is sealed and stored properly, whipped cream in a can can last up to two weeks in the refrigerator.
Are there any other options than canned whipped cream?
Indeed, there are a few options in contrast to involving whipped cream in a can, including making whipped cream without any preparation utilizing weighty cream and a whisk or electric blender, or utilizing whipped cream powder or whipped cream stabilizer.


